Showing posts with label cooking. Show all posts

Friday, August 10, 2012

Pinkalicious

Back in March, my friend Erica asked me to help make some Pinkalicious sugar cookies for her daughter, Reese's birthday. Pinkalicious is a book about a girl who ate a bunch of pink dessert especially pink cupcakes and thus, turned pink. I never read the story before but it looked adorably pretty! I also never made frosted sugar cookies in my life, how hard can it be? I said yes and then experiment a bit.

Oh boy, it took me hours to make just six cookies. But I already said yes, and I never say no to a challenge (well depends on what), so I got off work and started baking!!

I bought a set of three Wilton cookie cutters that has a cupcake shaped one. I want the cookies to be thin but not so thin that it breaks easily.


Bake until the edge is golden brown, and let it cool completely. Then time to frost!!

Cookie icing can be made with powder sugar and egg whites or meringe powder. I decided to use meringe powder since these are for little kids. I don't want to risk using egg whites even though the risk is quite low.


The hardest part about decorating cookies is waiting. I cannot apply the next layer until the first layer is dry, otherwise the second color will fuse with the first.


Hours after hours, layers after layers, they're ready and done!! The icing color dry lighter.

I also made a crown for Reese. I hope she liked it.

Iced sugar cookies are hard work! Nevertheless, I'm really glad I had a chance to make it though, and definitely appreciate those who hand -make their own too.

Wednesday, August 8, 2012

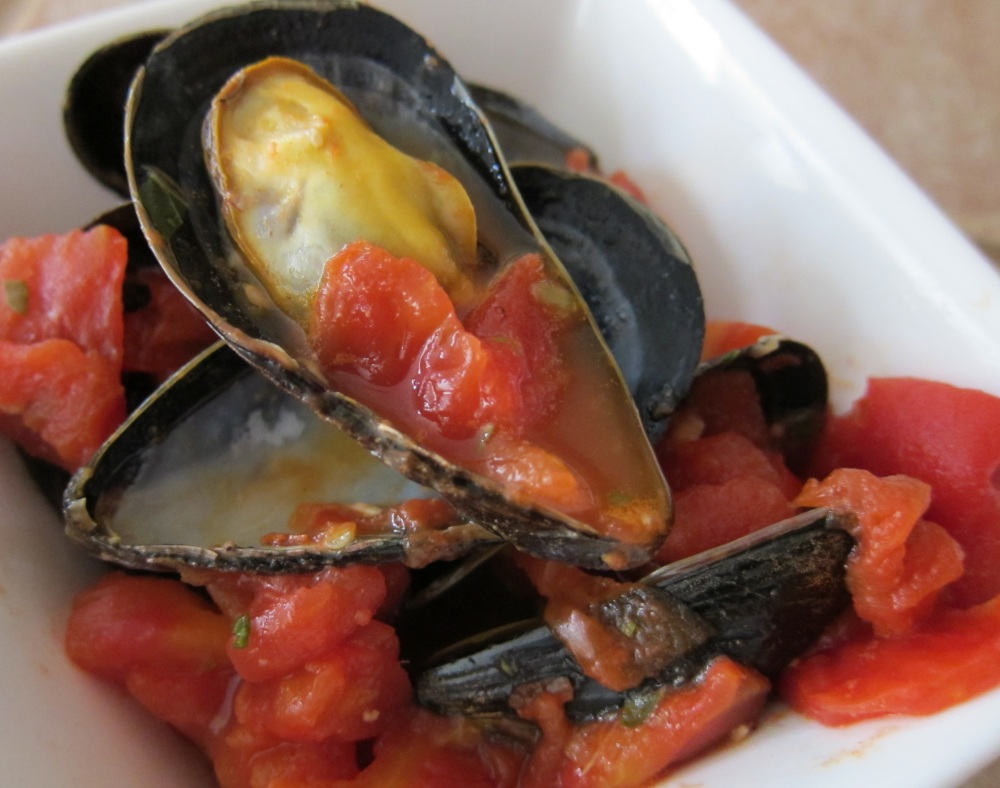
Mussels in Spicy Broth

I love mussels and would always order it if the restaurant offers it. I bought some really nice sustainable clams and mussels from I Love Blue Sea back in September, and was super excited to try making this delicious shellfish myself.

I was also very nervous cooking them because I never cook mussels before. I did some research on how to clean them and found a really nice and super easy recipe from Giada DeLaurentiis. She also used clams and shrimps, which I did not include this time.


How I Clean Mussels:
1. The night or several hours before: In a bowl, place mussels with salt water (~1/4 cups salt to 2 cups water).
2. Then sprinkle generous amount of cornmeal on top of the mussels.
3. Cover in foil, and place in refrigerator.
4. The next day or several hours later: Pour the dirty water away (there should be lots of dirt and debris).
5. Pull the beard off the side of the mussels toward the hinge of the shell.
6. With a brush, clean the shell of mussels in running water.
7. Mussels are then ready to use!

Ingredients:
  • 1/4 cup olive oil
  • 5 garlic cloves, minced
  • 1 bay leaf
  • 1 teaspoon dried crushed red pepper
  • 1 cup dry white wine
  • 1 (28-ounce) can diced tomatoes
  • 24 mussels (about 1 1/2 pounds total), debearded
  • 1/2 cup torn fresh basil leaves

  • Direction:

    1. Heat the oil in a heavy large pot over medium heat. Add the garlic, bay leaf, and crushed red pepper. Saute until the garlic is tender, about 1 minute.

    2. Add the wine and bring to a boil. Add the tomatoes. Bring to a simmer. Simmer until the tomatoes begin to break down and the flavors blend, about 5 minutes.

    3. Stir in the mussels. Cover and cook until mussels open, about 5 minutes longer.
    Using a tongs, transfer the opened shellfish to serving bowls (discard any shellfish that do not open).


    4.  Serve with the warm bread.

    Bon Appetit!

    Sunday, February 5, 2012

    HK Style Baked Chicken Over Fried Rice

    I grew up in Hong Kong, thus are exposed to Hong Kong style cafe food a lot. I love the breeze of air conditioning and the smell of the cafe when I stepped into the store. I like how fast the food comes out and I get a choice of milktea or iced tea with my entree. And I love how the food is consistent every time! One of my favorites is Baked Chicken Over Rice. It consists of a filet of pan-seared chicken thigh over a bed of fried rice, then topped with a sweet tangy tomato sauce, and then baked in the oven with cheese.

    [ Ingredients ]

    For chicken:
    2 filet of chicken thigh
    2 cloves of garlic, minced
    1 tsp of salt
    1/2 tsp of grinded black pepper
    1/4 tsp of powdered white pepper
    1/2 cup of flour

    For the fried rice:
    2 cup of overnight rice
    2 eggs
    1/2 tsp of salt

    For the sauce:
    3 tomatoes, chopped
    1/2 onion, chopped
    1/2 cup carrots, diced
    2 tablespoon of ketchup
    1/2 cup chicken stock
    1 tablespoon Worcestershire sauce
    1 teaspoon sugar
    1 bay leaf
    1 tablespoon corn starch
    2 tablespoon of water
    cheese, amount to liking


    [ Instruction ]

    For the fried rice:

    1. Heat a frying pan with 2 tablespoon of olive oil. Add eggs.
    2. Stir fry the eggs until done. Place it in a bowl.
    3. Add another 1 tablespoon of olive oil, and stir fry the rice. When the rice stopped clumping and separate by grain, add in the pre-fried eggs.
    4. Add salt and mix.
    5. Divide rice into two oven-safe dishes.

    For the chicken:1. Marinade by mixing all the ingredient EXCEPT for the flour with the chicken. Let it sits for 20 minutes.
    2. Pat both side of the chicken on a plate of flour. Shake off excess.
    3. In a heated frying pan with 1 tablespoon of olive oil, pan-fried the chicken.


    For the sauce:
    1. Preheat the oven at 350 degree F.
    2. In a sauce pan on medium heat, sautee garlic, onion and bay leaf until brown.
    3. Add in carrots and tomatoes. Cook until soft, mix occasionally.
    4. When carrots and tomatoes look soft, mash them with the spatula. The mixture should looks watery.


    5. Mix in ketchup, chicken stock, Worcestershire sauce and sugar.
    6. Let the sauce simmer on low for ten minutes.
    7. In a small bowl, mix corn starch with water to rid clumps.
    8. Add corn starch mixture into the sauce. Mix.
    9. Simmer for five minutes. The sauce should thicken.
    10. Laddle sauce over the fried rice.
    11. Sprinkle cheese over.
    12. Bake in a 350 degree F oven until the cheese melt or brown.


    Enjoy!


    Don't forget to add some veggies for a complete diet!

    Wednesday, January 18, 2012

    Raspberry Macaron

    I started making macaron at end of December. I was a little intimated with making macaron because it consists of so few ingredients, but the technique involves is complicated. To my surprise, my first batch turned out pretty good! The cookies have feet and are crunchy on the outside and chewy in the inside.
    Today I decided to make a raspberry one. This would be the fourth flavor I've made, along with vanilla, matcha and coffee.

    Macaron contains almond flour, powder sugar, granuated sugar and egg whites. There are the French style macaron and Italian style. Both are simliar except that the granulated sugar is melted in the Italian one.


    Weighing and sifting the dry ingredients are as important as the way to incorporate all the ingredients together by hand...yup, by hand! That step cannot be replaced by machine since it's very delicate.
    The consistency has to be correct. Running batter leads to flat and airy macaron. Hard macaron will lead to cracks on exterior of the cookie.


    Baking time also play a role. If the macaron is under-bake, the cookie is going to be stained. If it's over baked, it is going to be hard and non-chewy at all.


    Last but not least...the fillings! The filling is what gives the macaron the intense flavor of what it is supposes to taste like.


    For the raspberry macaron, I just made a simple buttercream and added couple tablespoons of raspberry perserves.

    These cookies are to die for! They are so small and colorful, which make great gifts!


    A few for myself, and some to share at work's potluck.


    Yummy! I can eat them all in one day if I want to...guilty pleasure!

    Saturday, January 7, 2012

    Mango Sticky Rice

    I always crave for something hot and creamy during the winter, like porridge, soup and mango sticky rice. I like my mango sticky rice served hot with fresh cold slices or cubes of mangoes. The hot and cold, sweet and creamy combo make this desert simply irresistible.


    Mango Sticky Rice
    (makes 4 servings)

    Ingredients:


    1 1/2 cups uncooked white glutinous rice
    • 1 1/2 cups water
    • 1 1/2 cups coconut milk
    • 3 tablespoon granulated sugar
    • 1/2 teaspoon salt
    • 2 mangos, peeled and sliced
    • 1 tablespoon toasted sesame seeds
    • 1/2 tablespoon cornstarch

    • Instruction:
      1. In a bowl, wash and then soak the rice in 1 1/2 cup of water for at least 1 hour, up to 4 hours. 
      2. Meanwhile, slice or dice the mangoes. Refrigerate. 
      3. Fill rice cooker with about 3 cups of water (a pot can also be used). Place a cheesecloth or a clean towel in a steamer, and place it in the rice cooker. 
      4. Pour the bowl of soaked rice and the water into the steamer. Let the rice steam for 45 minutes.
      5. While the rice cooks, mix together 1 1/2 cups coconut milk, 3 tablespoons of sugar, and 1/2 teaspoon salt in a saucepan over medium heat; bring to a boil; remove from heat.
      6. Pour the thin coconut milk mixture in a bowl and reserve 1/2 cup in the sauce pan. Add cornstarch to the saucepan and allow the remaining mixture to thicken. Set aside. 
      7. When the rice is done, place it in a bowl. Drizzle the thin coconut milk over it, mix, and let the rice soak the coconut milk. Add more of the thin mixture until the rice no longer soaks. 
      8. Place the sticky rice on a serving dish. Arrange the mangos around it. Spoon a few tablespoon of thickened coconut mixture on top of the rice and mangoes. Sprinkle with sesame seeds.

    Friday, January 6, 2012

    Momofuku Compost Cookie At Home

    After I had a taste of Momofuku's compost cookies in New York City, I was in love with it! It's one of my favorite cookies along with Teacake's chocolate hazelnuts. So while shopping for christmas presents at William Sonoma, I came upon Momofuku's cookie mixes. I did not see the flavor I want, but a few weeks later, my boyfriend brought home my favorite one! Lo and behold...he bought the compost cookie one.

    I highly recommend this box of goodie goodness. It's also available online at Momofuku Milkbar website. It's simple to do, and it tastes exactly like the store bought ones.


    Everything is nicely separated into packets. The package has all the main component. I just had to add my own butter, an egg, pretzels and potato chips.


    The mixture smells so good. The instruction said to separate the dough and roll it into 9 balls, but I rolled it into 10 instead.


    The cookie turned out thin, soft and super chewy. The reason I really like this cookie is because it's sweet and salty, and it's chewy and crunchy. It's the perfect balance of flavor and mouth-feel.

    Thursday, September 1, 2011

    Congrats Meiling & Marcus!


    My friends Meiling and Marcus got married on August 28th, and I'm so, so happy for them. They are so perfect for each other! They have such strong loves, bonds and chemistrys for each other that any bystanders can see they are one happy couple. Did I mention they both are very stylish? Check out Meiling's wedding gown and Marcus' cool shoes!

    Anyhow, I was very honored that they had ask me to bake 100 mini cupcakes for their dessert table at the reception. I was super excited because this was my very first large cupcakes order, all done at home. But it was amazing that after I lined them up, they all could fit on the island in my kitchen. So they weren't that big afterall...maybe a little.

    The cupcakes were vanilla velvet with a lavender cream cheese frosting to match her purple wedding theme. It was super making them and fun frosting them.

    Meiling made these super cute labels for the cupcakes and they looked so cute and perfect! They definitely added a lot of cuteness to the cupcakes.


    Tatah! The dessert table with yummy kettle corn, cookies from Anthony's Cookies in San Francisco (which I loved and reviewed before), assorted purple candies and mini cupcakes. I love the dessert table. It's so fun and classy, and it definitely made me feel like a kid at a candy store.

    The wedding ceremony was beautiful and the reception was amazing. Best wishes for the lovely couple!

    Saturday, July 16, 2011

    Cake on a Stick!

    They are chocolatey on the outside and soft and rich in the inside, and they are all conveniently secured on lollipop sticks. They are cake on a stick or better known as cake pops!

    I made my first cake ball when I was nine, but I never thought about putting them on a stick! Sixteen years later, Angie Dudley, also known as Bakerella, geniusly put them on a stick. She then published a book calls Cake Pops: Tips, Tricks, and Recipes for More Than 40 Irresistible Mini Treats, and cake pops got fun and popular since then! Super!

    A ready to eat cake pop

    Two months ago, my friend, Mei, asked me to make some cupcakes and cake pops for her sister, Meiling's, bridal shower. I was beyond excited because I love baking cupcakes and I always want to try making cake pops. Cupcakes are going to be easy for me, but cake pops will be a challenge since I have never made it before. Since the cake pops look super easy to make, I did not bother trying it out until the day before Mei coming over to pick them up.

    I baked the cake and made the frosting the night beofre, but I accidentally added too much frosting into the cake, so in the end, I had to remake everything the next morning. The frosting added to the crumbled cake is an important step! Add a little bit of frosting at a time!. Adding too much frosting will make the pops too wet and adding too little will make the pops too dry--both result in the cake balls not holding their shapes.

    I was running behind since I messed up on the mixture, so by the time Mei came over, I still had much to do. Mei was a big help! When it was time to cover the pops with chocolate, I realized I was totally wrong about this simple pop. This part took forever!Good thing we have four hands! So one of us ended up dipping the pops into the chocolate while the other put some sprinkle on and stick them into a styroform box to let dry. So the trick for us is to avoid all excessive movements that will make the cake ball fall off the lollipop stick. So instead of trying to tap off the excess chocolate, we just leave it. The cake pop still turned out good and the outer layer of chocolate is still thin.

    Ingredients:
    1 - 13 X 9 cake (from scratch or box mix)
    8 oz of frosting (from scratch or ready made tub)
    2 bags of candy melts
    1 - one tablespoon measuring spoon
    50 lollipop sticks
    1 giant styroform block

    Instruction:1. Bake your cake and make your frosting. Allow the cake to cool and frosting to be in room temperature.

    2. Once the cake is cool, crumble it in a big bowl or pan.

    3. Add 8oz of frosting into the crumbled cake and mix to combine.

    4. Use the one tablespoon measuring spoon and scoop the mixture. Roll mixture into a ball.
    5. Lay the rolled ball onto a parchment paper or a Silpat. Repeat with the rest of the mixture.

    6. With a small bowl, melt a little bit of the chocolate. Dip the lollipop stick about 1/4 inches into the melted chocolate.

    7. Stick the lollipop stick into the cake ball half way in. Repeat with all the cake balls.

    8. Place the cake balls into a fridge and let it cool for 15 minutes.
    9. Meanwhile, melt the rest of the chocolate in a large narrow bowl.
    10. Dip the cake pops into the melted chocolate. Optional: Tap gently with hand to rid access chocolate.
    11. Stick the wet cake pop into the styroform block to dry. If wish to use sprinkles, add them while the pop is still wet. The cake pop will look glossy when it's still wet, and look matte when dry. (Styroform block is not needed if wish to dry upside down. Just place the pop upside down onto a parchment paper).
    A wet cake pop

    12. Ready to eat or package when dry.

    Enjoy!

    Monday, June 27, 2011

    Simple "Cool" Snack

    It's summer and it's hot! Nothing like a ice cold snack after work to cool the rest of the day off. The mint lemon cocktail and the watermelon salad I had in mind was quick and easy, although a little preparation is needed ahead of time.

    Start by grinding up some fresh mints and lemon juice in a food processor. Do not dilute the mixture with water. After that, freeze the mixture in a ice tray for several hours. They are ready to use after that. These juice ice cubes come in handy for any quick cocktails or mocktails. A lime and mint combination is great for a cocktail like mojito or a mocktail with cranberry juice.


    When done, place several ice cubes in a martini or cocktail glass. X. Add a shot of my favorite gin, Hendrick, and fill the rest of the cup up with tonic water. Other gin or vodka works well too.


    Since a cocktail is meant to be enjoyed slowly, so as the lemon ice cube melts, the flavor enhances.


    To pair with this cocktail is a simple watermelon cucumber salad. The lemon, mint and watermelon combination is divine! And it's super simple to make.

    Make sure the watermelon and cucumber are cold. Cube some watermelon, and thinly slice some cucumber and chop some mint. Stack the watermelon and cucumber together and drizzle some balsamic vinegar over it. Lastly sprinkle some chopped mints. Serve while it's still cold.


    Try taking a bite with both watermelon and cucumber, and try to take sips of the lemon mint cocktail with it. The lemon would enhance the watermleon and cucumber flavor.

    Time to chill-lax!

    Sunday, June 26, 2011

    Happy Birthday Mei!

    My friend Mei is turning 30 this year and to celebrate her prime in coming, she is hosting a Roaring 30 party based on the roaring 1920 theme. She asked me to make her birthday cake, and I was more than happy to. She gave me my full control and creativity of the cake, since all she said was "surpise me!"

    To start, I wanted to make her cake based on the color theme of the party, pearl black and red. Then I want to make something elegant yet fun. A month before her birthday, I ordered all the ingredients and decorations I needed.

    I also decided to incorporate the color them into the cake too! So for the bottom tier, I am going to make a chocolate cake with mocha buttercream to match the black theme, and for the top tier, a red velvet with cream cheese frosting to match the red theme.

    Chocolate cake with mocha buttercream
     To make it elegant, I used lace ribbon and edible diamonds. To make it more fun, I added some ostrich feathers and a big 30.


    I wish I had more time. I made the cake after work one day, then frosted it and decorated after work the next day. I didn't want to frost it too early because I want to keep everything fresh. Even though it didn't turn out as perfect as I want it, it was super fun making it. I am super happy I got it done on time and that Mei loved it!

    Let the party begins!!


    Cheers!

    Happy Birthday Mei!!